• Home
  • Resume
  • My Gallery
  • free cutfiles
  • Youtube
facebook twitter instagram pinterest Bloglovin

Neat and Crafty

 Hi crafty friends,
 sharing another Christmas layout using the Go the Scenic Route collection 
I like using different colours for Christmas I think it’s fun and changes it up from the traditional colours plus it gives me a reason to get creative with florals but then again who needs a reason lol!!...


Starting with a white background using white cardstock  i then backed it with Paper 24 then next using my cameo I cut out CHRISTMAS TREE 335742 cut file using Paper 16 and adhered it down in the center of my background I then matted my photo on paper from the 6x8 Paper Pad and a white doily behind and then tucked some Ephemera Die Cuts in the right hand side to add colour and layers.


Then I started clustering Floral Die Cuts and fussy cut flowers from Paper 18 around my photo sticking to the same colours
And to add a little dimension to the main floral cluster I add a chipboard hear in the center of the flower then added a sub title from the Puffy Phrase Thickers


And the I wanted a colourful title using the Puffy Word Stickers , I chose colours from the florals and add them along the side of the tree 


Then I decided on a third cluster of flowers to create a visual triangle so it draws the eye across the page
I then fussy cut more flowers from Paper 18 and to finish off the layout I added a few rhinestones , a flick of white paint from my stash..


I hope you have enjoyed my Christmas inspiration today happy crafting ..

SUPPLIES:   Silhouette Cameo 3,  white cardstock , Chipboard Stickers ,Ephemera Die Cuts , Puffy Phrase Thickers , Floral Die Cuts , Paper 24 ,Paper 16 , Paper 18 ,

CUT FILES:CHRISTMAS TREE 335742
BY PAIGE EVANS


Share
Tweet
Pin
Share
No comment

Hi crafty friends, 

 sharing a card and ornament created with the Go the Scenic Route I absolutely love creating Christmas crafts all the shine and glitter just adore it...  

For my first card I wanted to use one of Paige’s SNOWFLAKES BACKGROUND 337747 cut file and use it as a stencil and foiled the background because who doesn’t love a bit of shiny goodness 


Then I machine stitched around the border and added to a pink cardstock base
Then using the MUG 336960 cut file I used my Silhouette Cameo 3 and  white cardstock and then I backed the little snowflake on the mug with Paper 10 then using some vellum I backed the main cup piece and then using pattern paper from the 6x8 paper pad I then offset the mug cut file and removed some pieces so I could cut the background of the mug. Then I finished backing the rest of the mug using paper from the 12x12 Paper Pad , Paper 14 , Paper 1 and Paper 16 and to finish off the card I added Enamel Dot in the middle of the snowflake and some glitter glue to the snowflake and gingerbread man.


And now my tree ornament I created using MITTENS 335745  cut file that I backed with Paper 16 , Paper 22  
I left the background behind the poinsettia and backed it with clear plastic added vellum behind then machine stitched around the edges leaving a little opening to add some sequins and glitter then machine stitched it closed added some twine underneath a Chipboard Stickers in the center of the poinsettia with a Enamel Dot in the center of the flower


I used a hole punch and added a eyelet to add some string and a charm and popped it on the tree.


I hope you have enjoyed my Christmas inspiration today happy crafting ..


SUPPLIES:   Silhouette Cameo 3,  white cardstock , 12x12 Paper Pad , Chipboard Stickers , 6x8 Paper Pad , Paper 16 , Paper 22 , Paper 1 , Paper 10 , Enamel Dots , Charms . Paper 14

CUT FILES: MITTENS 335745 , SNOWFLAKES BACKGROUND 337747 , MUG 336960
BY PAIGE EVANS


Share
Tweet
Pin
Share
No comment

 hi crafty friends, 

 sharing a layout for cocoa vanilla studio using the new Christmas collection merry and bright absolutely adore the colour palette 

I took a bunch of photos of my Christmas tree last year 


I started with white cardstock and some mixed media to add to the background using a stencil , heavy body gel and some light pink paint and Mixed it all together and applied it to the stencil then once it dried I trimmed down my white cardstock and added oh Christmas tree pattern paper to the back of the cardstock 


Then next I cut a strip of pattern paper from the 6x8 paper pad and added a fringe to one side then I punched a border with a border punch from joy to the world patterned paper added some crape paper to it to add more texture the I just layered them together and added them to the layout 


I then Matted my photo on papers from the 6x8 paper pad and created a tag from the 3 x 4 pocket card to tuck in my photo layers the a doily and adhered it down add it just over lapping the fringed border strip 


Then next I used a title cut file from @neatncraftycutz  to add on top of my border strip just overlapping the bottom of my photo then I started adding a bunch of ephemera and fussy cut flowers cut from joy to the world around my photo and title to add floral elements to the layout and a sticker from the sticker sheet to the top of my photo 


Then I finished off by adding some rhinestones from my stash to add some bling to the flowers and around the clusters.

pop on over and check out my process video on the cocoa vanilla studio YouTube channel  


I hope you have enjoyed my inspiration today 

And you are enjoying all the beautiful merry and bright creations .

Happy crafting...

Share
Tweet
Pin
Share
No comment
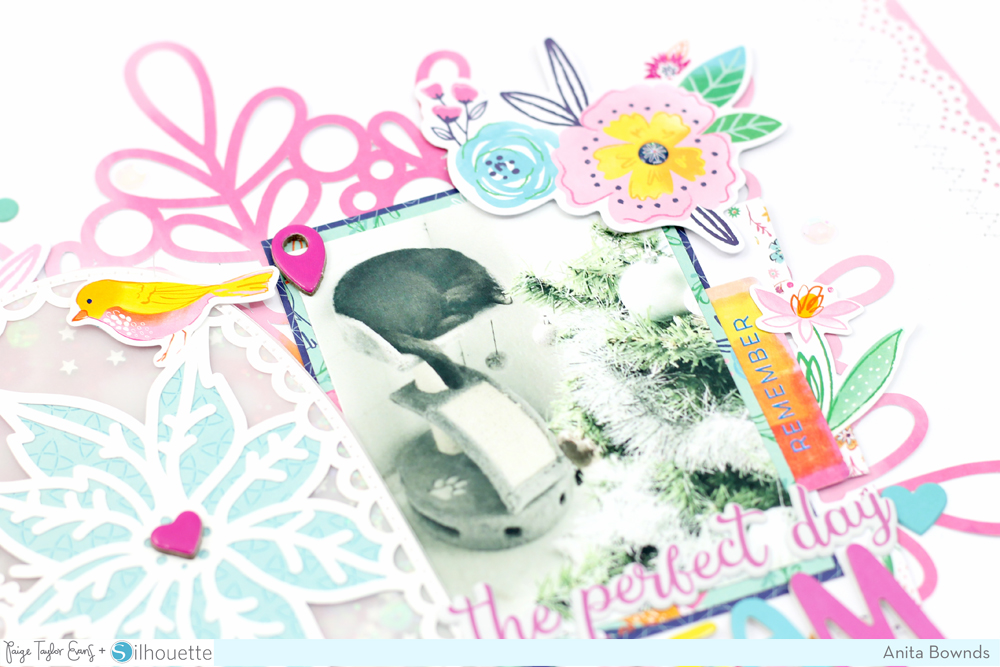
 Hi crafty friends, today I’m sharing a Christmas layout I know it’s not Christmas yet but it’s heating up in Australia and where I live it’s tropical heat so sweaty weather!! So Anyway I’m using the beautiful collection go the scenic route for my layout and the photo was taken last year of Luna kitty enjoying a nap near the Christmas tree on her scratching post. 


You know me  white cardstock background to start with I always love how the bright colours pop on it I guess that’s why I’m drawn to it...then using my Silhouette Cameo 3 and a snowflake cut file and a pattern paper from the 12x12 Paper Pad i cut it out and adhered it in the middle of the white cardstock , then decided I needed a touch of colour on the edges so I us a border punch and added 2 pretty punched borders down the left and right side of the white cardstock then ran it through my sewing machine to add some stitching and using the leftover from the snowflake cut I adhered that to the back to add that pop of pink. 


Next I cut out a mitten and used Paper 13 and Paper 22 to back the main parts then I cut 2 bits of vellum to add the the back of it to create a shaker mitten to add some sequins in then machine stitched it and added it to the left side of the snowflake then I used Paper 4 , Paper 15 to Matt my photo and a piece from the ephemera pack to tuck behind the layers and adhered it beside my mitten 


Then I started adding flowers from the Floral Die Cuts  and Ephemera Die Cuts around my photo and then a few more flowers around the layout I also added a few little bits from the Chipboard Stickers to the top of my photo and to the flowers in the middle of the mitten then I added a few little dots from the Puffy Phrase Thickers


Then a few of the Cardstock Stickers tucked in around my layers 
Then I added my title using the Puffy Phrase Thickers and the colourful Foam Thickers 


I hope you have enjoyed early Christmas my inspiration today happy crafting ..

SUPPLIES:   Silhouette Cameo 3,  white cardstock , 12x12 Paper Pad , Chipboard Stickers ,Ephemera Die Cuts , Foam Thickers  , cardstock stickers  , Puffy Phrase Thickers , Paper 13 ,Paper 22 ,Paper 4 , Paper 15 . Floral Die Cuts

CUT FILES: MITTENS 335745 , SNOWFLAKE 335743
BY PAIGE EVANS

Share
Tweet
Pin
Share
No comment
 Hi there crafty friends,
 I’m super excited to share a layout using go the scenic route collection it’s such a beautiful collection with all the pretty colours I wanted to document my counted cross stitch that that I love doing.


I started white cardstock I trimmed down on 2 sides to Matt on paper from the  12x12 Paper Pad and adhered it down. Then with my Silhouette Cameo 3 I cut out EMBROIDERY HOOP 330590 and LEAF 330593 cut files with white cardstock then next I cut out the LAYERED FLOWER 328337 with pattern paper from the  12x12 Paper Pad , I used more pattern paper from the  12x12 Paper Pad to back the LEAF 330593 I then back the EMBROIDERY HOOP 330590 with pattern Paper 16 and Paper 22 and added it to the center of the layout popped up on double sided foam tape.


I matted my photo on pattern papers from the 6x8 Paper Pad and tucked it just underneath the edge of the heart then I added the LAYERED FLOWER 328337 and add Chipboard Stickers to the center’s and adhered then down , I then fussy cut flowers from Paper 18 and tucked them around the LAYERED FLOWER 328337 I also tucked in the LEAF 330593 underneath each cluster. 

I add a few fussy cut flowers tucked underneath the bottom of my photo and one on the corner I then tucked a tag from the Ephemera Die Cuts in the photo layers and add a Puffy Phrase Thickers to the bottom of the photo and then I added a big title going around the top left side of the EMBROIDERY HOOP 330590 using the Foam Thickers  and a Puffy Phrase Thickers and a few hearts.


I hope you have enjoyed my pretty floral inspiration today happy crafting ..

SUPPLIES:   Silhouette Cameo 3,  white cardstock , 12x12 Paper Pad , Paper 16 , Paper 22 , Paper 18 , Chipboard Stickers ,Ephemera Die Cuts , Foam Thickers  , 6x8 Paper Pad , Puffy Phrase Thickers , 6x8 Paper Pad

CUT FILES:  LAYERED FLOWER 328337, LEAF 330593 ,EMBROIDERY HOOP 330590
BY PAIGE EVANS

Share
Tweet
Pin
Share
No comment
Older Posts

welcome to my crafty blog!

welcome to my crafty blog!

Design Teams

Scrapbook.com exclusive DT 2020

Sassy Scrappers DT 2020

Paige Evans + Silhouette Design Team July 2019/jan 2021


Cocoa vanilla Studio 2019 design team


Past Design teams

Prima Marketing 2017 July/2019 July

DoodleBug Design 2017 - 2018


kitaholic kits feb 2020 - Dec 2020

Shop Now!

Follow Me

  • facebook
  • twitter
  • instagram
  • pinterest
  • bloglovin
  • my etsy store

Follow me on Bloglovin

Follow

Translate

Instagram


Fave blogs

  • Doodlebug Design Inc Blog
  • My Mind's Eye Paper Goods
  • HIP KIT CLUB BLOG
  • Pink Paislee
  • Felicity Jane - Felicity Jane
  • Echo Park Paper
  • American Crafts Studio Blog
  • Pinkfresh Studio - Blog
  • Crate Paper
  • Kaisercraft Official Blog
  • Prima Marketing Blog
  • Fancy Pants Designs Studio
  • Pretty Little Studio
  • | Simple Stories

fav scrappy blogs

  • ✂— — Janna Werner—
  • Bea Valint
  •  ★Scraptherapie★
  • Glass Half Full
  • Dear Lizzy
  • Elsie Robinson
  • Cut.Paste.Repeat - Raquel Bowman
  • Chris and Paige

Scrap Challenge Blogs

  • White..with 1
  • More Than Words
  • Kraft+
  • Scrap The Girls
  • 123 Challenge Blog
  • jotmagazine
  • sketchabilities

Created with by ThemeXpose